Atuin replaces your shell history with a searchable database: fuzzy matching, filter by directory, …
/user/kayd
@
devops
:~$
cat aurora-add-reader-read-replica.md
Adding a Read Replica (Reader) to Aurora PostgreSQL Adding a Read Replica (Reader) to Aurora PostgreSQL


Karandeep Singh
• 8 minutes
Summary
How to add a read replica (reader) to an Aurora PostgreSQL cluster, understand the writer and reader endpoints, prove the reader is read-only, and send read traffic to it, all from the AWS console.
A single database instance handles both your writes and your reads, until the reads start crowding out the writes. The fix in Aurora is to add a reader: a second instance that serves read-only queries, so you can move read traffic off the writer. This article adds one to the database-1 cluster from the Aurora setup guide, explains the endpoints (the part that confuses newcomers), and proves the reader is genuinely read-only.
Prerequisites: an Aurora PostgreSQL cluster (see the setup guide) reachable with
psql from an EC2 box in the same VPC. This works on the exact cluster from the earlier articles.What a “reader” actually is
In Aurora, storage and compute are separate. The cluster owns the data (replicated across three Availability Zones); each instance is just compute that reads and writes that shared storage. Your cluster started with one instance, the writer, doing everything.
A reader (also called a read replica) is another compute instance pointed at the same shared storage. Because there’s no second copy of the data, adding a reader is fast and replication lag is typically single-digit milliseconds, not the seconds you might expect from traditional replication. The reader can serve SELECTs but physically cannot write, which is exactly what makes it safe to fan reads out to.
Expand your knowledge with EC2 Storage in Plain English: Root Volumes vs File Systems
A reader is a whole extra instance, so it adds its full hourly cost. Two
db.t3.medium instances cost roughly twice one. Add readers when reads genuinely need the headroom, and delete them when you’re done testing.Step 1: Add the reader (console)
- RDS → Databases →
database-1. - Actions → Add reader.
- Set:
- DB instance identifier:
database-1-instance-2 - DB instance class: Burstable →
db.t3.medium(match the writer) - Availability Zone: No preference — Aurora tends to place the reader in a different AZ from the writer, which is better for resilience
- DB instance identifier:
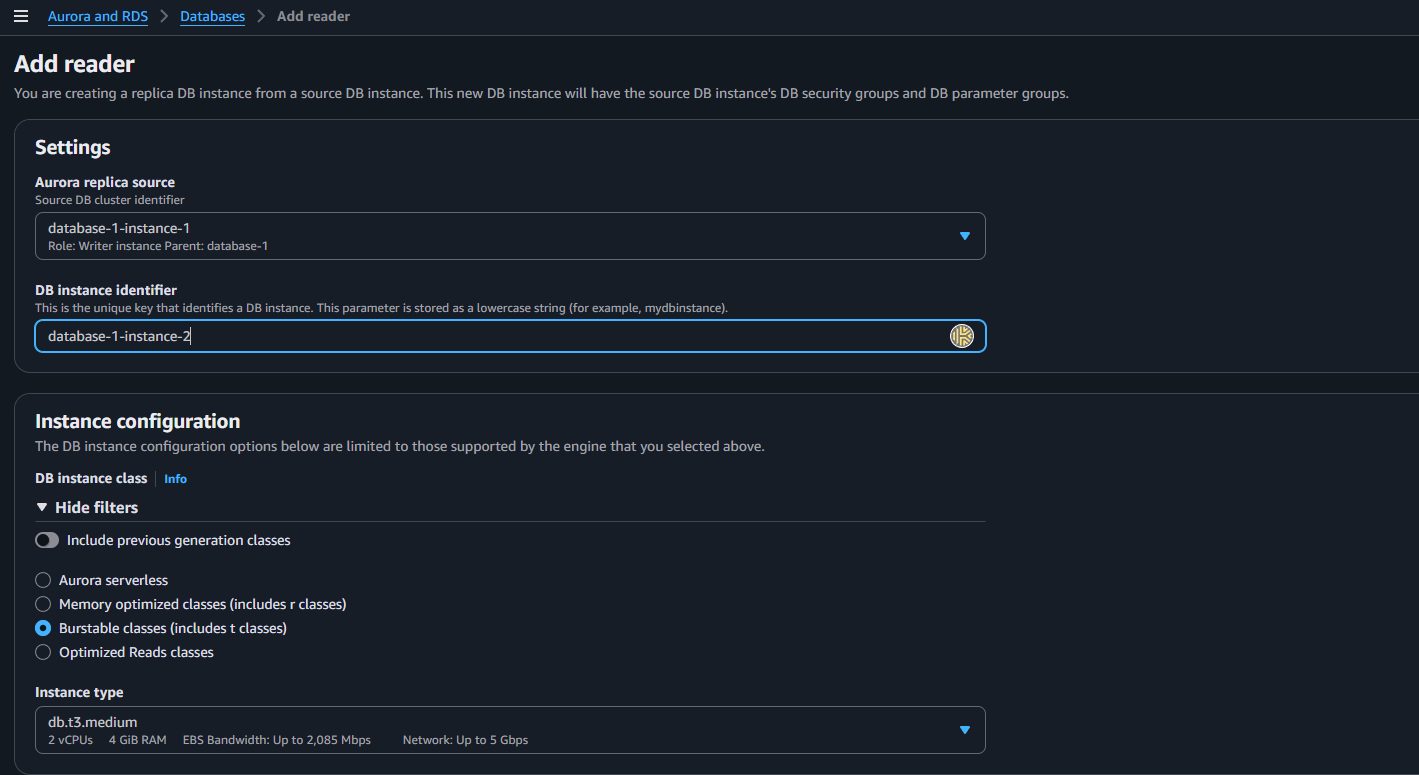
- Add reader, and wait ~5–10 minutes for Available.
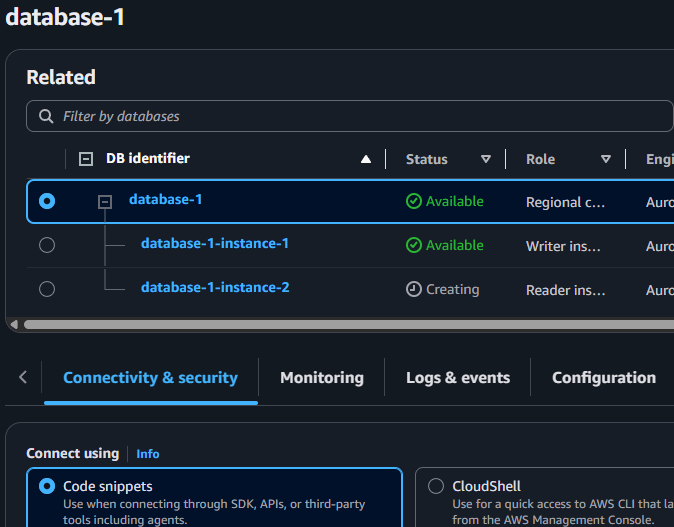
One convenience worth noting: the dialog says “This new DB instance will have the source DB instance’s DB security groups.” So the reader inherits valkey-demo-sg automatically, there’s no security-group step to repeat. When it’s done, the cluster shows two instances: database-1-instance-1 (Writer) and database-1-instance-2 (Reader).
Deepen your understanding in AWS CLI Automation: From Bash Scripts to Go
Step 2: The endpoints (this is the important part)
Adding a reader gives your cluster a second endpoint. On the Connectivity & security tab you now have:
- Writer endpoint —
database-1.cluster-xxxxxxxx.us-east-1.rds.amazonaws.com. Always points to the current writer. Send all writes (and reads that must be perfectly up to date) here. If a failover promotes a different instance to writer, this endpoint follows it automatically. - Reader endpoint —
database-1.cluster-**ro**-xxxxxxxx.us-east-1.rds.amazonaws.com(note thero). Load-balances read-only connections across all reader instances. Add more readers later and they join this endpoint with no application change. - Instance endpoints — one per instance (
database-1-instance-2.xxxxxxxx…). These point at one specific instance. Useful for debugging a single node, but avoid them in application code, they don’t move on failover and don’t load-balance.
The rule to remember: write to the writer endpoint, read from the reader endpoint, and stay away from instance endpoints in your app.
Explore this further in Nginx Log Analysis: From grep to a Go Log Parser
Step 3: Connect to the reader and prove it’s read-only
Grab the reader endpoint and connect from the EC2 box:
export READER="database-1.cluster-ro-xxxxxxxx.us-east-1.rds.amazonaws.com"
export PGPASSWORD='your-master-password'
psql "host=$READER port=5432 dbname=postgres user=postgres sslmode=verify-full sslrootcert=./global-bundle.pem"
At the postgres=> prompt, run three checks:
-- (a) reads work
SELECT count(*) FROM products;

-- (b) confirm this really is a reader
SELECT pg_is_in_recovery();

-- (c) writes are rejected
INSERT INTO products (name, category, price) VALUES ('nope', 'test', 1.00);
The results:
 count
--------
 100000

 pg_is_in_recovery
-------------------
 t

ERROR:  cannot execute INSERT in a read-only transaction
Three things confirmed: reads return data, pg_is_in_recovery() returns t (this instance is a replica, it would be f on the writer), and the INSERT is refused with cannot execute INSERT in a read-only transaction. That last error is the safety guarantee, you literally cannot corrupt data by pointing a write at the reader by mistake.
Discover related concepts in Cloning an Aurora PostgreSQL Cluster (Copy-on-Write)
Step 4: Route reads to the reader
With the endpoints in hand, splitting traffic is a configuration change, not a code rewrite: send reads to the reader endpoint and writes to the writer endpoint. In the cache-aside app from earlier, the SELECT would connect to $READER while any INSERT/UPDATE uses the writer:
import os, psycopg

writer = psycopg.connect(f"host={os.environ['RDSHOST']} ... ")   # writes
reader = psycopg.connect(f"host={os.environ['READER']} ... ")    # reads

def top_products(category):
    with reader.cursor() as cur:      # read query -> reader endpoint
        cur.execute("SELECT id, name, price FROM products WHERE category = %s ORDER BY price DESC LIMIT 10", (category,))
        return cur.fetchall()
Because the reader endpoint load-balances, scaling reads later is just “add another reader”, the endpoint spreads connections across all of them automatically.
Uncover more details in CPU Monitoring: From Linux Commands to a Go Dashboard
Watch out for replication lag with read-after-write. If your app writes a row and then immediately reads it back from the reader, the read can occasionally miss it by a few milliseconds. For “read your own writes” flows (a user saving then viewing their profile), read from the writer; for general browsing traffic (product listings, dashboards), the reader is perfect. Check the
AuroraReplicaLag CloudWatch metric to see the actual lag, usually a handful of milliseconds.How far this scales: replicas, failover, and DR
Once you’ve added one reader, three questions come up straight away. Here are the answers.
How many readers can I add?
Up to 15 readers per Aurora cluster, so 16 instances in total counting the writer. They all read the same shared storage, so you’re not copying data 15 times, you’re just adding compute that fans out across the reader endpoint. In practice you add readers when the reader endpoint’s instances are saturated, not before, because each one bills at its full hourly rate.
When does a reader become the writer?
On failover. Aurora always has exactly one writer; if that instance fails (hardware fault, AZ outage) or you trigger a failover manually, Aurora promotes one of the readers to writer, and the whole switch typically completes in about 30 seconds. Two things make this painless:
- The endpoints follow the promotion. The writer endpoint re-points at the newly promoted instance and the reader endpoint drops it from the read pool, all without you changing a connection string. This is the entire reason your app should use the cluster endpoints and never the instance endpoints.
- You control who gets promoted with failover priority (tiers 0–15, where 0 is the highest priority). Aurora promotes the available reader with the lowest tier number; if several share a tier, it picks the one whose size is closest to the writer. You set this per instance under Modify → Failover priority.
You can rehearse it safely: RDS → database-1 → Actions → Failover forces a promotion. Run SELECT pg_is_in_recovery(); before and after against the writer endpoint, and you’ll watch the answer flip from f to t on the old writer as its role changes.
A manual failover is the cleanest way to apply certain changes (or just to prove your app survives one) because the ~30-second promotion is far shorter than a full instance reboot. Do it during a quiet window the first time, so you can see exactly how your connection pool reacts.
How much disaster recovery do I already have?
More than you’d think, before you configure anything. Aurora storage keeps six copies of your data across three Availability Zones (two per AZ), and it can tolerate losing an entire AZ without data loss and keep serving reads with only two of the six copies. On top of that, Aurora continuously backs up to Amazon S3 and supports point-in-time recovery (PITR) to any second within your retention window. That’s your baseline durability, and it’s on by default.
Adding a reader in a different AZ (which “No preference” tends to do for you) upgrades that further: now you have a warm standby that can be promoted in ~30 seconds, so you get high availability, not just durability, within the region.
What none of this covers is a whole-region outage, everything above lives in us-east-1. Surviving the loss of a region is a different feature called Aurora Global Database, which replicates to a second region with typical lag under a second and lets you fail over across regions. That’s its own setup, and it’s the subject of the next article in this series, Add an AWS Region.
Journey deeper into this topic with Database Scaling: From 100K to 5M Users
Clean up
The reader doubles your compute bill, so remove it when you’re done: RDS → Databases → database-1-instance-2 → Actions → Delete. That leaves the writer (and your data) untouched, since the storage is shared and independent of any single instance.
Enrich your learning with Bash String Functions: Trimming, Case, and Reversal
Wrapping up
Scaling reads in Aurora is mostly about understanding the endpoints. Add a reader instance, send reads to the reader endpoint (which load-balances and grows as you add more readers) and writes to the writer endpoint (which always tracks the current writer), and let the reader’s read-only nature protect you from mistakes. Mind replication lag for read-after-write, watch the cost of extra instances, and you have horizontal read scaling with almost no application change. For the shell and SQL around this, see my Ubuntu Terminal cheatsheet.
Gain comprehensive insights from Adding an AWS Region to Aurora PostgreSQL (Global Database)
References and Further Reading
- Amazon Web Services. Adding Aurora Replicas to a DB cluster.
- Amazon Web Services. Amazon Aurora connection management (endpoints).
- Amazon Web Services. Aurora replication and replica lag.
Question
How do you split reads and writes in your app, endpoint config, a proxy, or an ORM's read-replica support?
Similar Articles
Related Content
More from cloud
Cut AWS Lambda cost: what you are actually billed for, why more memory is rarely cheaper, the exact …
How I turned a Hugo blog into a public MCP server on Netlify — tools, resources and prompts over a …
You Might Also Like
Livestream from your phone with Amazon IVS and no code, with every channel setting explained: …
Design an AWS Lambda system for a million users an hour: capacity math, concurrency, cold starts, …
Knowledge Quiz
Test your general knowledge with this quick quiz!
A set of multiple-choice questions to test your knowledge.
Take as much time as you need.
Your score will be shown at the end.
Question 1 of 5
Score: 0
Quiz Complete!
Your score: 0 out of 5
Loading next question...
Contents