Atuin replaces your shell history with a searchable database: fuzzy matching, filter by directory, …
/user/kayd
@
devops
:~$
cat valkey-aws-elasticache-guide.md
Valkey on AWS ElastiCache: A Hands-On Guide Valkey on AWS ElastiCache: A Hands-On Guide


Karandeep Singh
• 11 minutes
Summary
A start-to-finish walkthrough of running Valkey on AWS ElastiCache, built from a real hands-on session, complete with the security-group mistake, the TLS surprise, and a small health-check script.
I finally sat down and ran Valkey on AWS ElastiCache end to end, from an empty console to a working health-check script, and took notes on every wrong turn. This is that walkthrough. If you have ever wondered how to stand up a managed Valkey cache, reach it from your own code, and test it properly, this guide covers the whole path, including the two or three things that quietly go wrong the first time.
Valkey on AWS ElastiCache is worth knowing because Valkey is the open-source, community-run fork of Redis (now under the Linux Foundation), and AWS made it a first-class ElastiCache engine at a lower price than the Redis OSS option. You get an in-memory data store for caching, sessions, queues, and rate limiting, without running the servers yourself. I did this on a single tiny node so the whole exercise cost pennies.
What you need to follow along: an AWS account, a region picked (I used
us-east-1), and permission to create ElastiCache, EC2, and security-group resources. I was signed in as an admin, so I skipped the IAM policy step. If you are not an admin, attach AmazonElastiCacheFullAccess plus AmazonEC2ReadOnlyAccess to your user.Why Valkey on AWS, and what it costs
Valkey speaks the same protocol as Redis, so your existing clients and commands (SET, GET, DEL, TTL) all work unchanged. On ElastiCache you pick between Serverless (fastest to start, TLS always on, a floor around $6/month) and a node-based cluster where you choose the server size and pay per hour.
For a demo, the node-based path is cheaper and clearer. I used a single cache.t4g.micro node. On Valkey that is $0.0128 per hour in us-east-1 — about $0.31 for a full day, or roughly $9.30 if you left it up for a month.
That hourly rate is worth a second look, because it is the 20% Valkey discount made concrete: the same cache.t4g.micro node is $0.016/hour on Redis OSS or Memcached, and 0.0128 ÷ 0.016 is exactly 0.8. You are not reading a rounded marketing number — the discount is in the rate card.
The golden rule that keeps this a pennies exercise regardless: delete everything the same day.
Expand your knowledge with Tuning AWS Lambda for Cost: The Memory Myth, Measured
Valkey, Redis, or Memcached?
ElastiCache actually offers three engines, and if you are new to caching it helps to know what each one is:
- Redis OSS is a hugely popular in-memory data store. It is more than a cache: alongside simple
GET/SETit gives you real data structures (lists, hashes, sets, sorted sets, streams), optional persistence to disk, replication, and pub/sub messaging. In early 2024 Redis changed its license to terms that are no longer open source. - Valkey is the community’s answer to that license change: a fork of Redis 7.2, kept open source under the Linux Foundation and backed by AWS, Google, Oracle, and others. It speaks the same protocol and commands as Redis, so it is a drop-in replacement, and AWS prices it about 20% cheaper than Redis OSS. That is why I reached for Valkey here.
- Memcached is the old-timer: a bare-bones, multi-threaded cache that stores plain key/value pairs and nothing more. No data structures, no persistence, no replication. It is fast and simple, and still a fine choice when all you need is a big, plain cache in front of a database.
Rule of thumb: choose Valkey (or Redis) when you want data structures, persistence, or replication, which covers most real applications. Choose Memcached only when you want the simplest possible key/value cache and nothing more.
Deepen your understanding in Valkey as a Cache in Front of Aurora PostgreSQL (Cache-Aside)
Serverless or a node-based cluster?
Whichever engine you pick, ElastiCache asks how you want to run it. The two options bill and scale very differently:
| Serverless | Node-based cluster | |
|---|---|---|
| Capacity | Scales automatically and instantly | You choose node type and count |
| Billing | Data stored (GB-hours) + requests (ECPUs), ~$6/month floor | Per node, per hour |
| Best for | Spiky or unpredictable traffic; getting started fast; not managing capacity | Steady, predictable load; fine-grained control; cost tuning with reserved nodes |
| TLS | Always on | Optional (you choose at creation) |
| Cheapest small footprint | No (that ~$6 floor) | Yes (a cache.t4g.micro is pennies a day) |
For production with bursty traffic and nobody to babysit capacity, Serverless is the easy win: it scales up and down on its own and you never size a node. For a steady workload, a specific instance type, or a cost-controlled demo like this one, a node-based cluster wins. I chose node-based purely because a single tiny node is the cheapest way to learn.
Explore this further in Boto3 + AWS Lambda: A Production Serverless Pipeline
Step 1: Create the security group first
A Valkey cache lives inside a VPC and sits behind a security group, which is just a firewall. I created that first so the cache and the client machine could share it.
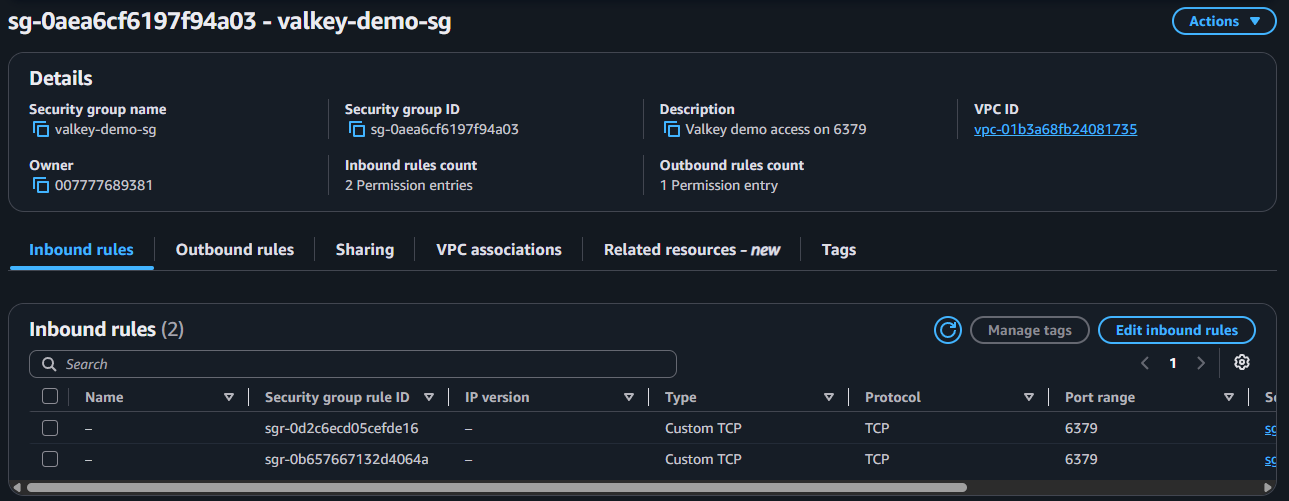
In EC2 → Security Groups → Create security group, I made valkey-demo-sg in the default VPC and added one inbound rule: Custom TCP, port 6379, source = the same security group. That self-referencing rule is a clean pattern: anything wearing this security group is allowed to talk to anything else wearing it, no IP addresses to manage.
Discover related concepts in AWS Security Audit: From AWS CLI to a Go Security Scanner
Step 2: Launch an EC2 client in the same VPC
Here is the first thing people miss: ElastiCache is only reachable from inside its VPC. You cannot connect from your laptop. You need a small machine in the same network to run your client from.
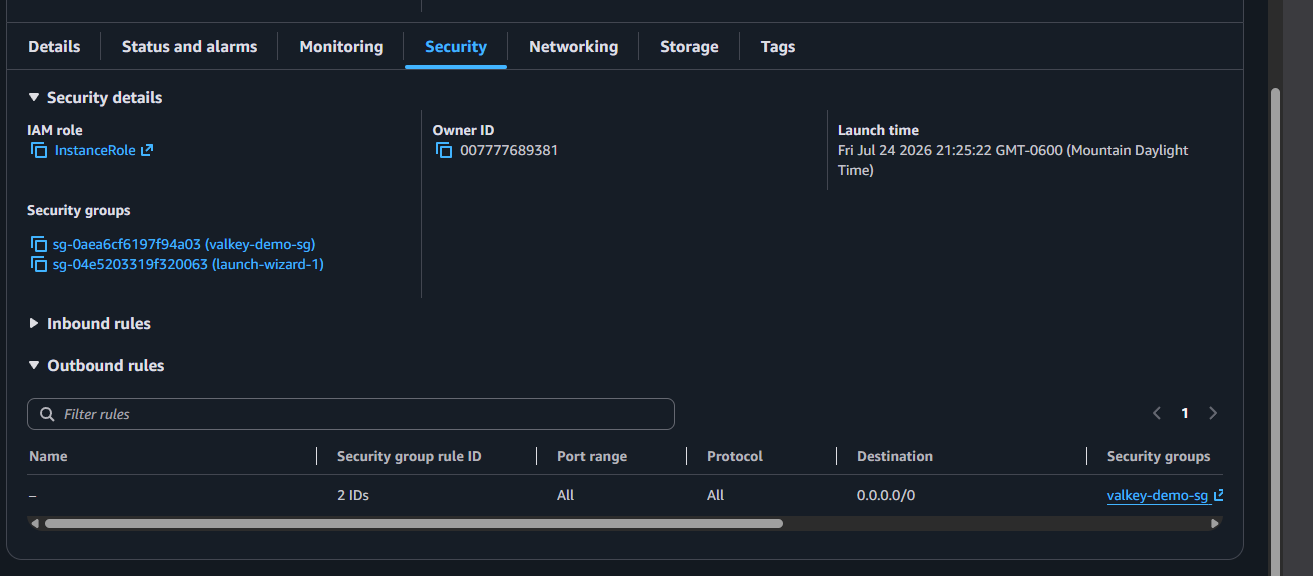
I launched a t3a.micro EC2 instance named valkey-demo-client (Ubuntu, though Amazon Linux works just as well), enabled a public IP, and, importantly, attached both the SSH security group and valkey-demo-sg. That second group is what will later let the box reach the cache.
Uncover more details in EC2 Storage in Plain English: Root Volumes vs File Systems
If you use Ubuntu, EC2 Instance Connect (the browser SSH button) may fail because the Ubuntu image does not ship its helper. Session Manager is the better route: no key pair, no open SSH port, it just needs the instance to have an IAM role with SSM access. That is how I connected.
Step 3: Create the Valkey cache
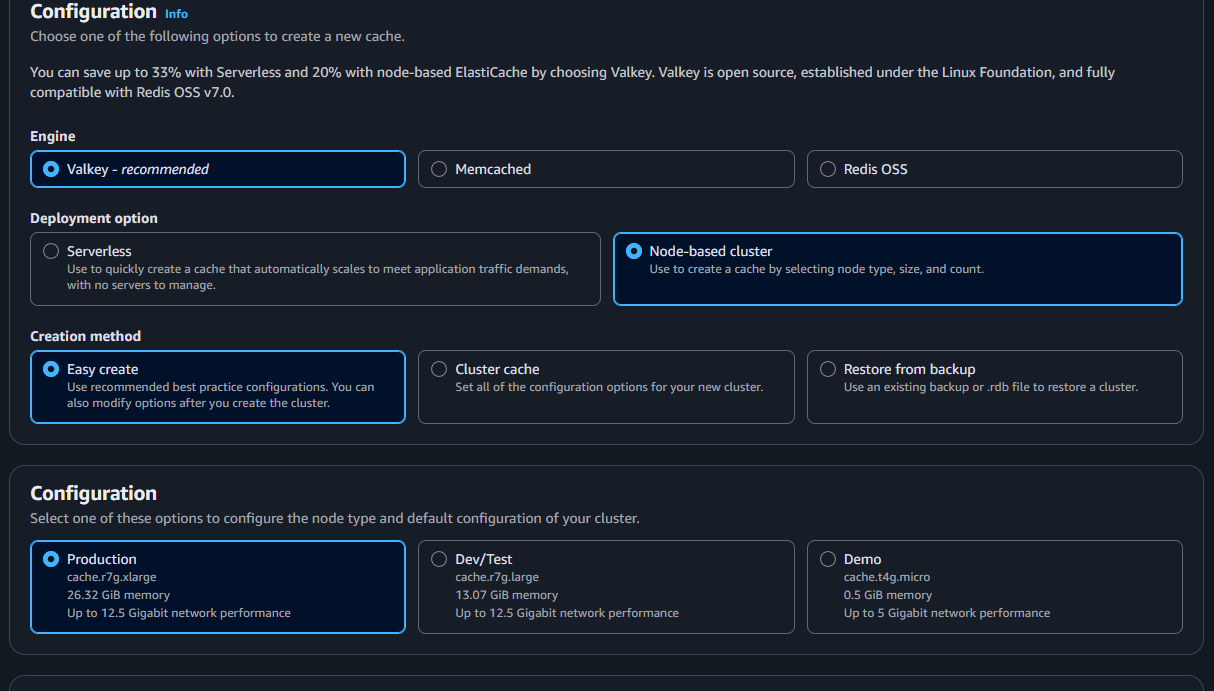
Back in ElastiCache → Valkey caches → Create, I chose Design your own cache → node-based cluster. One warning: the wizard defaults the Configuration preset to a large Production node (an r7g.xlarge, hundreds of dollars a month). I switched the creation method to full control and set:
- Node type:
cache.t4g.micro - Replicas: 0
- Name:
valkey-demo
It sat in Creating for about seven minutes, then flipped to Available with a configuration endpoint like clustercfg.valkey-demo.xxxxxx.use1.cache.amazonaws.com:6379.
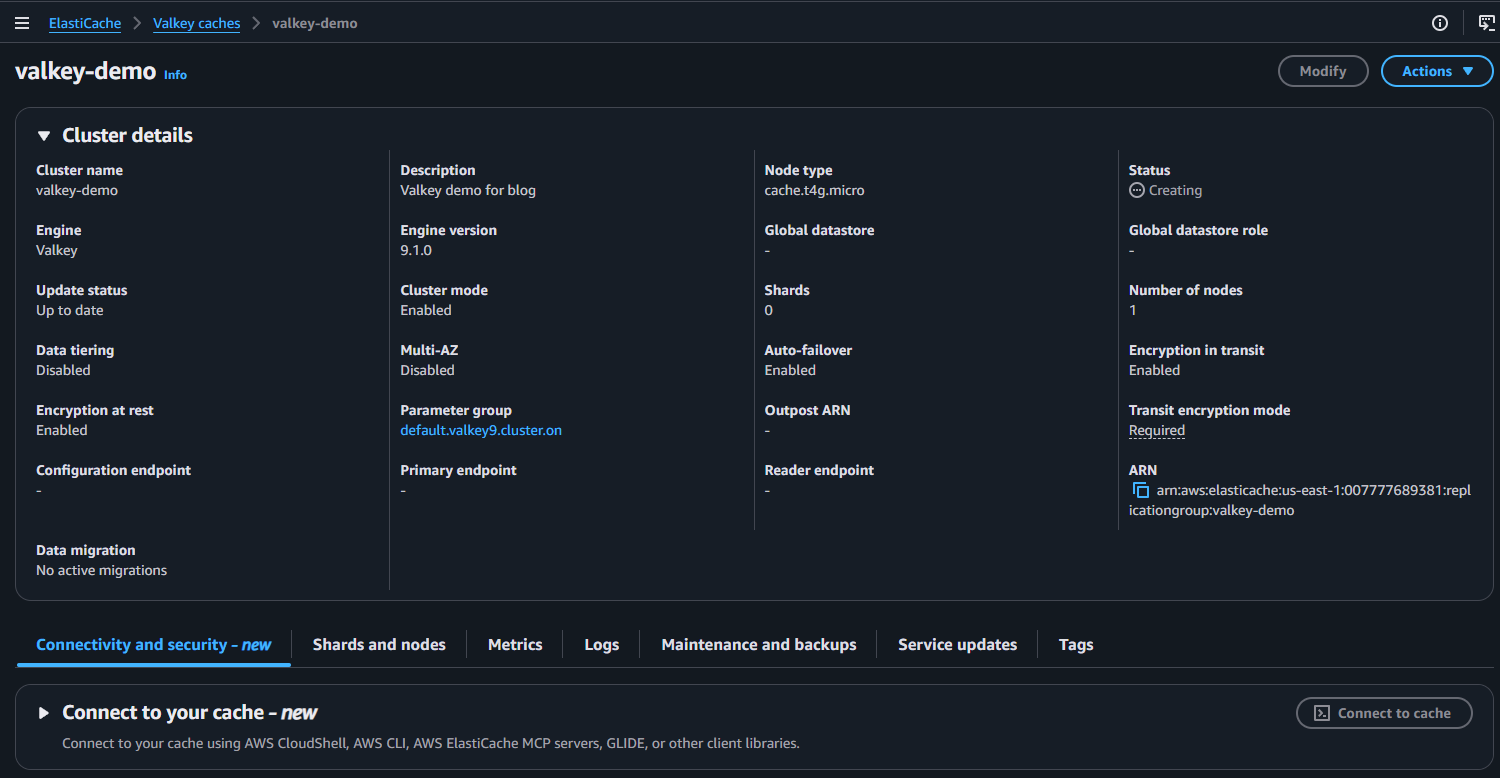
Two settings landed differently than I expected, and both are locked at creation time, so plan for them:
Journey deeper into this topic with Valkey as a Cache in Front of Aurora PostgreSQL (Cache-Aside)
- Cluster mode was Enabled. That is fine; you connect via the configuration endpoint and good client libraries handle the topology automatically.
- Encryption in transit was Required. This means every client must speak TLS. It is one extra flag, and it matches how you would really run this, so I left it.
Step 4: The connection that hung, and why
With the cache Available, I connected to the EC2 box over Session Manager and set up Python. Ubuntu will not let you pip install system-wide, so I used a virtual environment, which is just a private sandbox for the packages:
sudo apt-get update
sudo apt-get install -y python3-venv python3-pip
mkdir valkey-demo && cd valkey-demo
python3 -m venv venv
source venv/bin/activate          # your prompt now starts with (venv)
pip install valkey                # the official Valkey Python client
Then I wrote the smallest possible program: connect and PING. Because the cache has cluster mode on and TLS required, I used the cluster client with ssl=True:
# app.py
from valkey.cluster import ValkeyCluster

client = ValkeyCluster(
    host="clustercfg.valkey-demo.xxxxxx.use1.cache.amazonaws.com",
    port=6379,
    ssl=True,
)

print("cache says:", client.ping())
Running python3 app.py hung for a while, then failed:
valkey.exceptions.ValkeyClusterException: Valkey Cluster cannot be connected.
Please provide at least one reachable node: Timeout connecting to server
A timeout, not a rejection, is the classic signature of a network block, not a code bug. I checked the cache’s security group and found the problem immediately: the create wizard had put the cache on the VPC default security group, not on valkey-demo-sg. My EC2 client wore valkey-demo-sg, so it was never allowed in on port 6379.

The fix took thirty seconds: Modify the cache, add valkey-demo-sg, and remove default.
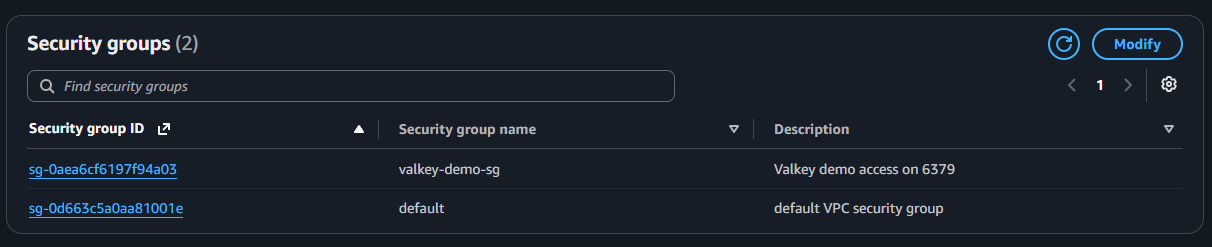
Because that group already allowed 6379 from itself, and the client was a member, the very next run connected:
Enrich your learning with Self-Healing Bash: Functions That Recover From Failures
cache says: True
This is the number-one gotcha with ElastiCache. The wizard silently defaults the security group. Always confirm the cache’s security group matches the one your client is in. A timeout with no error message almost always means a blocked port, not broken code.
Step 5: Test with valkey-cli, the tool you already have
I did not need to write a program to poke at the cache. Valkey ships valkey-cli, its own command-line client. On Ubuntu I installed it with sudo apt-get install -y valkey-tools and connected with the two flags this cache requires:
valkey-cli -h clustercfg.valkey-demo.xxxxxx.use1.cache.amazonaws.com -p 6379 --tls -c
The --tls flag is mandatory here (encryption in transit is Required), and -c turns on cluster mode so the CLI follows the cache’s “that key lives on another shard” redirects. From there it is plain Valkey:
> SET region us-east-1
OK
> GET region
"us-east-1"
> SET version v2.0.1 EX 300
OK
> KEYS *
1) "version"
2) "region"
> DEL region
(integer) 1
Two things bit me here, and both are good to know:
- Keys are case-sensitive.
GET REGIONreturned(nil), whileGET regionreturned the value. They are two different keys. - TTL really auto-expires. A key I set with
EX 10vanished fromKEYS *on its own after ten seconds. To check the time left from inside the CLI, useTTL keyname(it returns seconds remaining,-1for no expiry, or-2if the key is already gone). Note thatsleepis a shell command, not a Valkey one, so the cache rejects it.
If you want a fast refresher on the shell side of this, my Ubuntu Terminal cheatsheet and Amazon Linux 2 Terminal cheatsheet cover the apt/yum and systemd commands I leaned on.
Gain comprehensive insights from Build a Go CLI Tool for AWS S3
Step 6: When to reach for a script instead
The CLI is perfect for poking around. A script earns its place only when you need something repeatable that the CLI is clumsy at. For me that was a health check: connect, write a canary value, read it straight back, and confirm they match, the kind of probe a monitor or cron job runs on a schedule.
I built it up one piece at a time in Python. The core is small:
import time
from valkey.cluster import ValkeyCluster

ENDPOINT = "clustercfg.valkey-demo.xxxxxx.use1.cache.amazonaws.com"

client = ValkeyCluster(host=ENDPOINT, port=6379, ssl=True, decode_responses=True)

# write a unique canary value, then read it back and compare
token = str(time.time())
client.set("healthcheck:canary", token, ex=30)
got = client.get("healthcheck:canary")

if got == token:
    print("OK: cache is healthy (write + read matched)")
else:
    print(f"FAIL: expected {token}, got {got}")
A few deliberate choices in that small block:
- The canary uses a unique timestamp each run, so a stale leftover value can never fool the check into a false “healthy.”
ex=30gives the canary a 30-second TTL, so it cleans up after itself and never clutters the cache.ssl=Trueis required because of encryption in transit, andValkeyCluster(not the plain client) is used because the cache runs in cluster mode.decode_responses=Truereturns plain strings instead of raw bytes, sogotcompares cleanly.
To make it a genuine monitoring probe rather than a demo, you would add two small things: a proper exit code (sys.exit(0) on pass, sys.exit(1) on fail) so cron or a monitor can act on it, and a connect timeout so it fails in a few seconds instead of hanging when the cache is down. The Python patterns behind this live in my Python Basics & CLI cheatsheet, and if you script AWS more broadly, the Python Boto3 cheatsheet is the companion piece.
Master this concept through Sed for JSON: Emergency Patterns When jq Is Unavailable
A Python virtual environment only applies to the shell that activated it. A cron job or systemd service must call the venv’s Python directly, for example
/home/ubuntu/valkey-demo/venv/bin/python healthcheck.py, rather than relying on source venv/bin/activate.Common pitfalls, and how to avoid them
- Connecting from your laptop. ElastiCache is VPC-only. Run your client on an EC2 instance (or another resource) inside the same VPC.
- The default security group. The create wizard may attach the cache to
default. Confirm it matches your client’s group, or the connection times out with no useful error. - Forgetting TLS. If encryption in transit is Required, every client needs it:
--tlsfor the CLI,ssl=Truein Python. Without it you hang. - Cluster mode surprises. Use the configuration endpoint and a cluster-aware client. Use
SCANinstead ofKEYSon large datasets to avoid stalling the server. - Leaving it running. The node bills per hour whether you use it or not. Delete it when you are done.
Step 7: Clean up so you are not billed
The cheap demo stays cheap only if you tear it down. In ElastiCache, delete the valkey-demo cache (skip the final backup). Then delete the subnet group, terminate the valkey-demo-client EC2 instance, and remove the demo security groups. That returns your hourly charges to zero.
Deepen your understanding in Valkey as a Cache in Front of Aurora PostgreSQL (Cache-Aside)
Wrapping up
Running Valkey on AWS ElastiCache is mostly about the network around it: a security group the client shares, an EC2 box inside the VPC, and TLS on the wire. Once those line up, Valkey behaves exactly like the Redis you already know. Test interactively with valkey-cli, and reserve scripts for the repeatable jobs, like the health check, where code genuinely beats typing. Build it small, watch the timeouts, and delete it when you are done.
Deepen your understanding in Valkey as a Cache in Front of Aurora PostgreSQL (Cache-Aside)
References and Further Reading
- Valkey Project. Valkey Documentation.
- Amazon Web Services. Amazon ElastiCache for Valkey.
- Valkey. valkey-py Python client.
- Amazon Web Services. ElastiCache subnet groups and VPC access.
- Amazon Web Services. Encryption in transit for ElastiCache.
Question
Have you moved any workloads from Redis to Valkey yet, and what pushed the decision?
Similar Articles
Related Content
More from cloud
Cut AWS Lambda cost: what you are actually billed for, why more memory is rarely cheaper, the exact …
How I turned a Hugo blog into a public MCP server on Netlify — tools, resources and prompts over a …
You Might Also Like
Livestream from your phone with Amazon IVS and no code, with every channel setting explained: …
Design an AWS Lambda system for a million users an hour: capacity math, concurrency, cold starts, …
Knowledge Quiz
Test your general knowledge with this quick quiz!
A set of multiple-choice questions to test your knowledge.
Take as much time as you need.
Your score will be shown at the end.
Question 1 of 5
Score: 0
Quiz Complete!
Your score: 0 out of 5
Loading next question...
Contents