Atuin replaces your shell history with a searchable database: fuzzy matching, filter by directory, …
/user/kayd
@
devops
:~$
cat valkey-cache-aside-aurora-postgresql.md
Valkey as a Cache in Front of Aurora PostgreSQL (Cache-Aside) Valkey as a Cache in Front of Aurora PostgreSQL (Cache-Aside)


Karandeep Singh
• 7 minutes
Summary
The hands-on second half, connecting Python to Aurora PostgreSQL and Valkey, implementing the cache-aside pattern, and measuring a real 46 ms database read drop to 0.7 ms from cache.
In the last two articles I stood up a Valkey cache and an Aurora PostgreSQL database. On their own they are just two boxes on a network. This article connects them the way you actually would in production: Valkey in front of Aurora as a cache-aside layer, so hot reads are served from memory and the database is left alone.
The result up front, measured on a real query over 100,000 rows:
1st call: DB (Aurora)        46.52 ms
2nd call: CACHE (Valkey)      0.69 ms
3rd call: CACHE (Valkey)      0.70 ms
That is roughly a 67x speedup on the repeat read, and every cached call is one that never touches Aurora. Here is how to build it, including the three or four things that tripped me up.
This is part three of a series. Part one created the Valkey cache, part two created and explained the Aurora PostgreSQL cluster. Here we wire them together. You will want both of those running, in the same VPC, reachable from an EC2 box.
What is cache-aside?
Cache-aside (also called lazy loading) is the most common caching pattern, and it is only three steps:
- The app asks the cache for the data.
- Hit: return it, done.
- Miss: read from the database, return it, and also write it into the cache with a time-to-live (TTL) so the next read is a hit.
The database stays the source of truth; the cache just remembers recent answers. Nothing writes to the cache except the app, and entries expire on their own.
Expand your knowledge with AWS Lambda Configuration Explained: What to Care About (and Why)
Step 1: Make both stores reachable
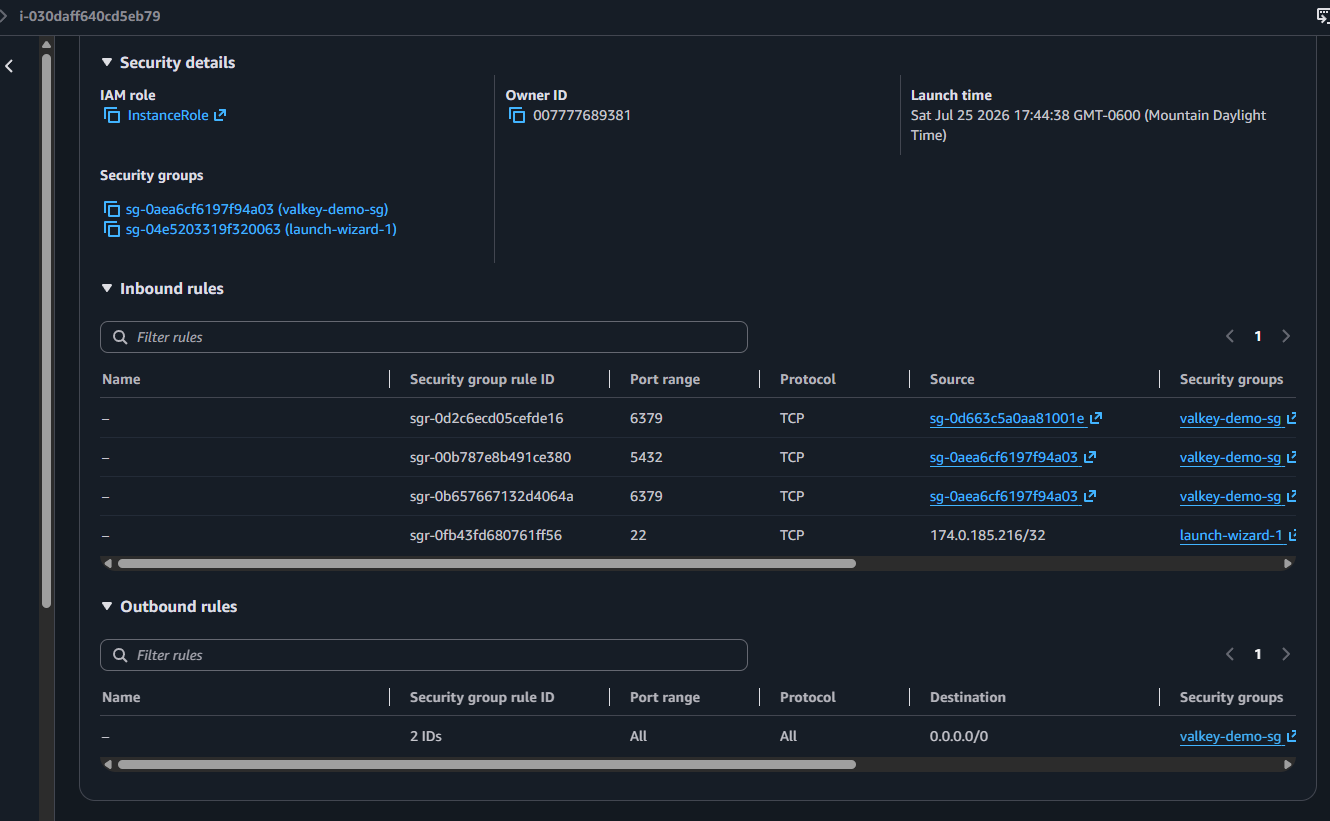
Both Aurora and Valkey live inside the VPC and sit behind security groups. The recurring lesson from the whole series: the client and the data store must share a security group, and that group needs a self-referencing rule on the right port.
My EC2 box wears valkey-demo-sg. So that group needs:
- an inbound rule on 6379 (Valkey), source = itself, and
- an inbound rule on 5432 (PostgreSQL), source = itself.
And crucially, both the Aurora cluster and the Valkey cache must also be members of valkey-demo-sg. I hit a connection timeout on Aurora until I added the group to the cluster (RDS → Modify → security groups), and the same on the cache, which had been created with Easy create on the default group.
Deepen your understanding in Valkey on AWS ElastiCache: A Hands-On Guide
A
Connection timed out (rather than a rejection or auth error) almost always means a security group is blocking you, not that your code or endpoint is wrong. If the port hangs, check group membership first.Step 2: Connect to Aurora with psql
On the EC2 box, install the PostgreSQL client and grab the RDS certificate bundle so the connection can be fully verified:
sudo apt-get update && sudo apt-get install -y postgresql-client
curl -o global-bundle.pem https://truststore.pki.rds.amazonaws.com/global/global-bundle.pem
Then connect, using sslmode=verify-full, which not only encrypts the connection but verifies you are really talking to your AWS database and not an impostor:
export RDSHOST="database-1.cluster-xxxxxxxx.us-east-1.rds.amazonaws.com"
psql "host=$RDSHOST port=5432 dbname=postgres user=postgres sslmode=verify-full sslrootcert=./global-bundle.pem"
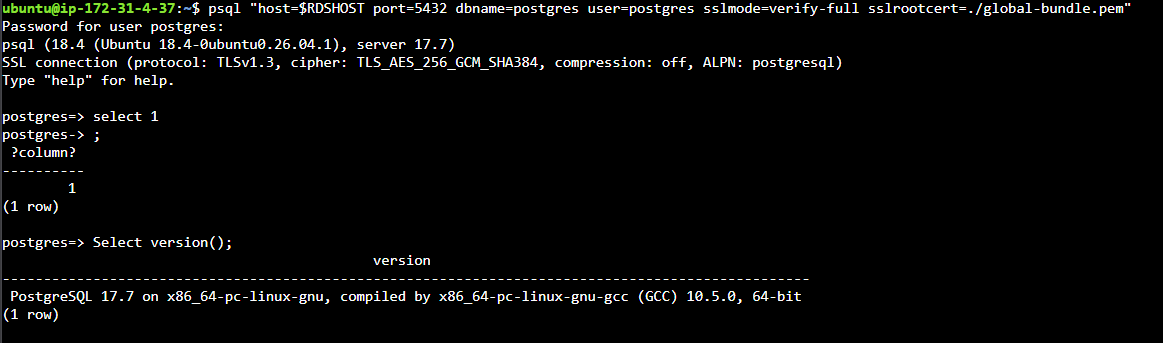
Two small gotchas I hit here:
Explore this further in Running SQL Over HTTPS with the RDS Data API (Aurora PostgreSQL)
- The cert path is relative, so run psql from the directory that has
global-bundle.pem(or use an absolute path). - If you pass the password through the
PGPASSWORDenvironment variable, wrap it in single quotes so the shell does not eat special characters, and avoid/ ' " @in RDS passwords entirely.
Step 3: Create a table and seed data
At the postgres=> prompt, build a table worth caching, 100,000 products across five categories:
CREATE TABLE products (
    id         SERIAL PRIMARY KEY,
    name       TEXT NOT NULL,
    category   TEXT NOT NULL,
    price      NUMERIC(10,2) NOT NULL,
    created_at TIMESTAMPTZ DEFAULT now()
);

INSERT INTO products (name, category, price)
SELECT
    'Product ' || g,
    (ARRAY['electronics','books','clothing','home','toys'])[1 + (g % 5)],
    round((random() * 500 + 5)::numeric, 2)
FROM generate_series(1, 100000) AS g;
The query we will cache is “the 10 most expensive products in a category”, a sort over 20,000 rows per category, expensive enough that caching clearly pays off.
Discover related concepts in Adding an AWS Region to Aurora PostgreSQL (Global Database)
Step 4: Query Aurora from Python (the baseline)
Set up a virtual environment and install both clients:
python3 -m venv venv && source venv/bin/activate
pip install "psycopg[binary]" valkey
Then a bare query, timed, to establish the baseline:
import os, time, psycopg

conn = psycopg.connect(
    f"host={os.environ['RDSHOST']} port=5432 dbname=postgres user=postgres "
    f"password={os.environ['PGPASSWORD']} "
    f"sslmode=verify-full sslrootcert=/home/ubuntu/global-bundle.pem"
)

SQL = "SELECT id, name, category, price FROM products WHERE category = %s ORDER BY price DESC LIMIT 10"

with conn.cursor() as cur:
    start = time.perf_counter()
    cur.execute(SQL, ("electronics",))
    rows = cur.fetchall()
    print(f"Aurora returned {len(rows)} rows in {(time.perf_counter()-start)*1000:.1f} ms")
On my run this printed around 20-46 ms depending on warmth, the cost of a real database round trip and sort.
Uncover more details in Running SQL Over HTTPS with the RDS Data API (Aurora PostgreSQL)
Step 5: The cache-aside layer
Now the actual pattern. Check Valkey first; on a miss, read Aurora and populate the cache with a 60-second TTL:
import os, time, json, psycopg
from valkey.cluster import ValkeyCluster

# Source of truth: Aurora PostgreSQL
pg = psycopg.connect(
    f"host={os.environ['RDSHOST']} port=5432 dbname=postgres user=postgres "
    f"password={os.environ['PGPASSWORD']} "
    f"sslmode=verify-full sslrootcert=/home/ubuntu/global-bundle.pem"
)

# Cache: Valkey (cluster mode + TLS)
cache = ValkeyCluster(host=os.environ["VALKEY_HOST"], port=6379,
                      ssl=True, decode_responses=True)

SQL = "SELECT id, name, category, price FROM products WHERE category = %s ORDER BY price DESC LIMIT 10"

def query_db(category):
    with pg.cursor() as cur:
        cur.execute(SQL, (category,))
        cols = [d.name for d in cur.description]
        return [dict(zip(cols, row)) for row in cur.fetchall()]

def get_top_products(category):
    key = f"top10:{category}"
    start = time.perf_counter()

    cached = cache.get(key)                 # 1. look in Valkey first
    if cached is not None:
        rows, source = json.loads(cached), "CACHE (Valkey)"
    else:                                   # 2. miss -> read Aurora
        rows = query_db(category)
        cache.set(key, json.dumps(rows, default=str), ex=60)   # 3. store 60s
        source = "DB (Aurora)"

    return rows, source, (time.perf_counter() - start) * 1000

if __name__ == "__main__":
    for label in ("1st call", "2nd call", "3rd call"):
        rows, source, ms = get_top_products("electronics")
        print(f"{label}: {source:16} {ms:7.2f} ms  ({len(rows)} rows)")
A few details that matter:
Journey deeper into this topic with Why YouTube-Scale Systems Need SQS: Architecture Notes
decode_responses=Trueso Valkey returns strings we canjson.loads, andssl=Truebecause the cache requires TLS.json.dumps(rows, default=str)because thepricecolumn is aDecimal, which JSON cannot serialize on its own;default=strhandles it.ex=60sets a 60-second TTL, the cache cleans itself up, and stale data can only live for a minute.- The cache key,
top10:electronics, encodes the exact query. Different category, different key.
The result
1st call: DB (Aurora)        46.52 ms  (10 rows)
2nd call: CACHE (Valkey)      0.69 ms  (10 rows)
3rd call: CACHE (Valkey)      0.70 ms  (10 rows)
The first call pays the full Aurora cost. Every call within the next 60 seconds is served from Valkey in under a millisecond, roughly 67x faster, and Aurora never sees them. Under real traffic that is the difference between a database straining under repeated identical queries and one that only handles genuinely new reads.
Enrich your learning with CI Pipeline Basics: From Shell Scripts to a Go Build Runner
Cache-aside shines for reads that are frequent, identical, and tolerant of being slightly stale (a leaderboard, a product listing, a config lookup). It is a poor fit for data that must always be perfectly fresh, or for reads that are almost never repeated, there the cache miss cost is pure overhead.
A word on invalidation
The TTL is the simplest invalidation strategy: data can be up to 60 seconds stale, and that is fine for a “top products” list. When the underlying data must update immediately, for example after an admin edits a product, you also delete the affected key on write (cache.delete("top10:electronics")) so the next read repopulates it from Aurora. TTL plus delete-on-write covers most real cases.
Gain comprehensive insights from The Complete Guide to AWS S3 Static Website Hosting
Clean up
The Aurora cluster is the expensive part of this build (a db.t3.medium runs about $2/day). When you are done:
Master this concept through Bash String Functions: Trimming, Case, and Reversal
- RDS →
database-1→ Actions → Delete (skip the final snapshot for a demo). - ElastiCache →
valkey-cluster→ Delete. - Terminate the EC2 client and remove the demo security groups if you are finished with the whole series.
Wrapping up
Caching is not exotic. It is a cache-aside function, a TTL, and a security group that lets your app reach both stores. Aurora stays the source of truth, Valkey absorbs the repeated reads, and a 46 ms query becomes a 0.7 ms one. For the Python patterns behind this, see my Python Basics & CLI cheatsheet; for scripting AWS around it, the Python Boto3 cheatsheet.
Delve into specifics at Adding an AWS Region to Aurora PostgreSQL (Global Database)
References and Further Reading
- Valkey Project. Valkey Documentation.
- Amazon Web Services. Caching strategies: lazy loading and write-through.
- Psycopg. psycopg 3 documentation.
- Amazon Web Services. Using SSL/TLS to encrypt a connection to a DB cluster.
Question
What do you cache in front of your primary database, and how do you decide the TTL?
Similar Articles
Related Content
More from cloud
Cut AWS Lambda cost: what you are actually billed for, why more memory is rarely cheaper, the exact …
How I turned a Hugo blog into a public MCP server on Netlify — tools, resources and prompts over a …
You Might Also Like
Create a copy-on-write Aurora clone in minutes, prove it is isolated from the source, and learn when …
Run SQL over HTTPS on Aurora PostgreSQL with the RDS Data API: no persistent connection, no VPC, IAM …
Let an Aurora read replica accept writes. Hands-on local write forwarding in PostgreSQL, the global …
Knowledge Quiz
Test your general knowledge with this quick quiz!
A set of multiple-choice questions to test your knowledge.
Take as much time as you need.
Your score will be shown at the end.
Question 1 of 5
Score: 0
Quiz Complete!
Your score: 0 out of 5
Loading next question...
Contents